How to Install OpenClaw on AGX Orin/AGX Thor ?

OpenClaw is a framework that allows you to develop AI agents capable of performing tasks autonomously using large language models (LLMs). Unlike classic chatbots, OpenClaw agents don’t just generate responses; they can also use tools, make decisions, and automatically execute multi-step tasks.
Simply put, OpenClaw transforms an LLM from a “passive conversation model” into an active digital assistant.
With OpenClaw, you can:
- Develop agents that connect to APIs
- Automate tasks like file reading and data processing
- Set up AI assistants that work via Telegram / WhatsApp
- Create agents with multiple skills
The AI world is rapidly transitioning from “chatbots” to “agents.” OpenClaw stands out in this transformation, especially with its modular and extensible architecture.
How to Install ?
First, Node.js version 22 or 24 must be installed using the following commands:
Note: If you have multiple nvm versions on your system, use nvm use –lts to use the LTS version.
Then, to install OpenClaw globally:
After installation, to start OpenClaw via terminal:
Security Warning ⚠️
The screen that appears is basically where OpenClaw says “I’m powerful but I can also be dangerous.” This screen displays the following warnings:
- “This is not a chatbot”
- “I can be tricked with prompts”
- “Multi-user is dangerous”
- “Don’t use if you don’t know security”
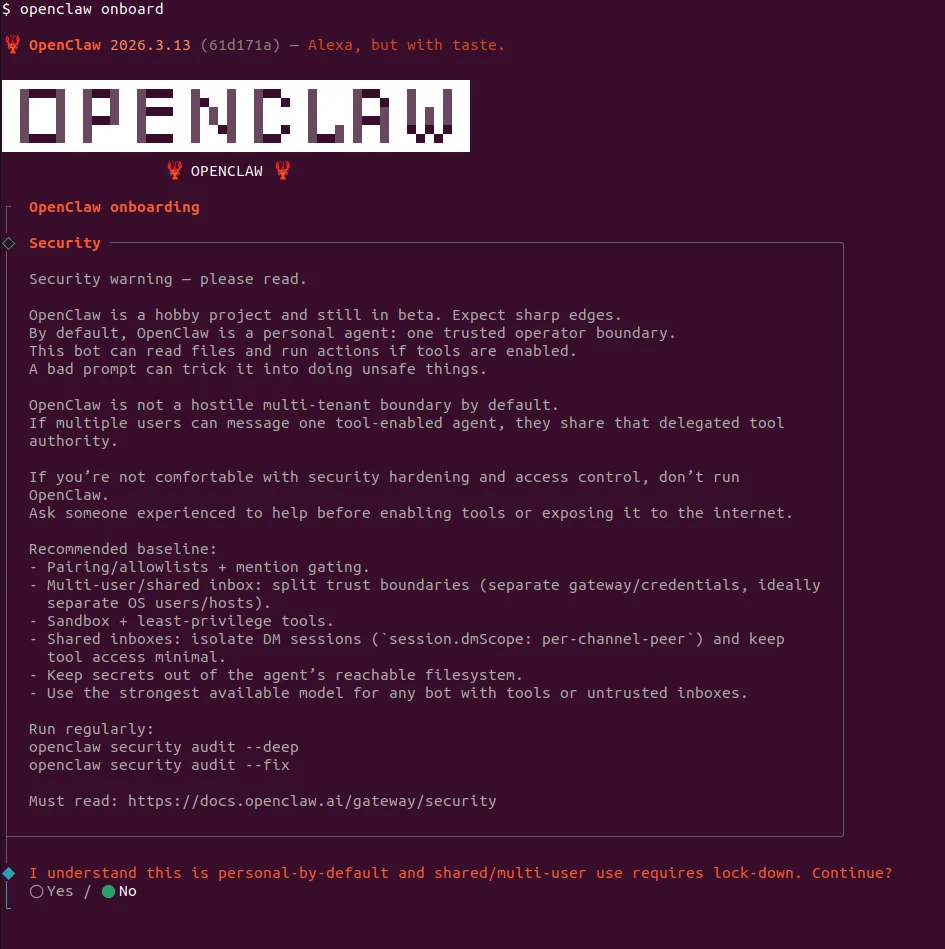
When running AI agents with tool access like OpenClaw, isolating them in a container (Docker) provides a basic security layer.
Configuration Steps
The setup wizard will ask you for several configuration settings:
1. Model and Authentication
Here we select the model and authentication provider for OpenClaw. This is the step where we determine which LLM the agent will use and how it will connect to that model.

2. Platform Selection
Here we select which platform the OpenClaw agent will run on (e.g., Telegram, WhatsApp, Notion). This is the step where we determine which channel users will communicate with the agent through.

3. Search Provider
Here we select the search provider service that will give the OpenClaw agent the ability to search the internet. This is the step where we determine which search engine (e.g., Brave, Google, etc.) the agent will use when searching the web.

4. Skills
Here we select which skills (abilities) will be added to the OpenClaw agent and whether the necessary dependencies will be installed. This is the step where we determine which tools the agent can use (e.g., GitHub, web, file operations, etc.).

You can also download skills separately from Clawhub.ai. To download a selected skill from there:
5. API Keys and Hooks
Here we offer options to enter API keys for some skills connected to the OpenClaw agent and enable automation (hooks) features. This is the step where we determine whether the agent will integrate with external services and take automatic actions on certain commands.
What are Hooks?
Hooks are actions that automatically run when a specific event occurs in OpenClaw. For example, when you give a command, the agent can log or save the conversation to memory without you needing to do anything extra. This structure automates repetitive tasks and makes the agent act more “intelligently.”
In short, hooks allow the agent to do some work on its own in the background.

Desktop Application
To use OpenClaw with a graphical interface:
Setting up a model with vLLM
Follow these steps to run OpenClaw on NVIDIA Jetson devices (AGX Orin or AGX Thor). These instructions run the vLLM inference engine inside a Docker container to perform LLM inference.
Step 1: Download Reasoning Parser
Create the directory where we’ll download the required parser script for reasoning model support. Then download the custom Python script from HuggingFace that parses the reasoning output from the NVIDIA-Nemotron-3-Nano model. This script is necessary to understand the model’s “thinking” process (reasoning output):
Note: $HF_TOKEN environment variable should contain your HuggingFace token. E.g.: export HF_TOKEN=hf_xxxx
Step 2: Clear System Cache
Clear memory cache to improve inference performance:
Step 3: Start vLLM Docker Container
This command starts the inference server using NVIDIA’s specially compiled vLLM image for Jetson. Parameter explanations:
| Parameter | Description |
|---|---|
| –runtime=nvidia | For NVIDIA GPU access |
| –network host | For network access (runs on port 8000) |
| -e HF_TOKEN | Required token for HuggingFace model download |
| -v ~/vllm_plugins:/plugins | Mount parser script into container |
| -e VLLM_FLASHINFER_MOE_BACKEND=throughput | Use throughput-optimized backend |
| -e VLLM_USE_FLASHINFER_MOE_FP4=1 | Mount parser script into container |
Choose the correct image for your device:
For AGX Orin:
For AGX Thor:
The model may take a little time to load. You can continue after you see this screen.

Step 4: Start OpenClaw Dashboard
After pasting the command into the terminal, you will receive a key. You can use this key to access OpenClaw via the dashboard.

How Are Agents Controlled
In OpenClaw, the behavior, tasks, and identity of an agent are defined by .md files. These files essentially work as the agent’s memory, personality, and skill configuration.
Core Files
| File | Description |
|---|---|
| AGENTS.md |
The main file that defines how the agent operates. It specifies which files to read at startup and how to behave.
|
| SOUL.md | Defines the agent’s character, behavior style, and limits. This is where “what kind of entity” it is comes from. |
| USER.md | Determines who the agent is talking to and how to address them. |
| IDENTITY.md | Holds the agent’s name, style, and general identity. |
| TOOLS.md | Defines which tools the agent can use. |
| HEARTBEAT.md | Allows the agent to perform periodic checks. If empty, it does nothing; if filled, periodic tasks run. |
| BOOTSTRAP.md | Used for the agent to introduce itself when first started. Usually deleted after setup. |
These files can be found in this directory:
/home/<username>/.openclaw/workspace