NVIDIA NIM: Deploy and Scale Models on Your GPU
What is NVIDIA NIM?
NVIDIA NIM is a set of easy-to-use microservices designed to accelerate the deployment of generative AI models across the cloud, data center, and workstations. NIMs are categorized by model family and a per model basis. For example, NVIDIA NIM for large language models (LLMs) brings the power of state-of-the-art LLMs to enterprise applications, providing unmatched natural language processing and understanding capabilities. NIM abstracts what happens in the background during model inference. In other words, you don’t need to deal with technical details such as how the model works, which engine or runtime is used. As a user, you simply run the model, and NIM takes care of the details.
How Does NVIDIA NIM Works?
NIMs are packaged as container images on a per model/model family basis. Each NIM is its own Docker container with a model, such as meta/llama3-8b-instruct. These containers include a runtime that runs on any NVIDIA GPU with sufficient GPU memory, but some model/GPU combinations are optimized. NIM automatically downloads the model from NGC, leveraging a local filesystem cache if available. Each NIM is built from a common base, so once a NIM has been downloaded, downloading additional NIMs is extremely fast.
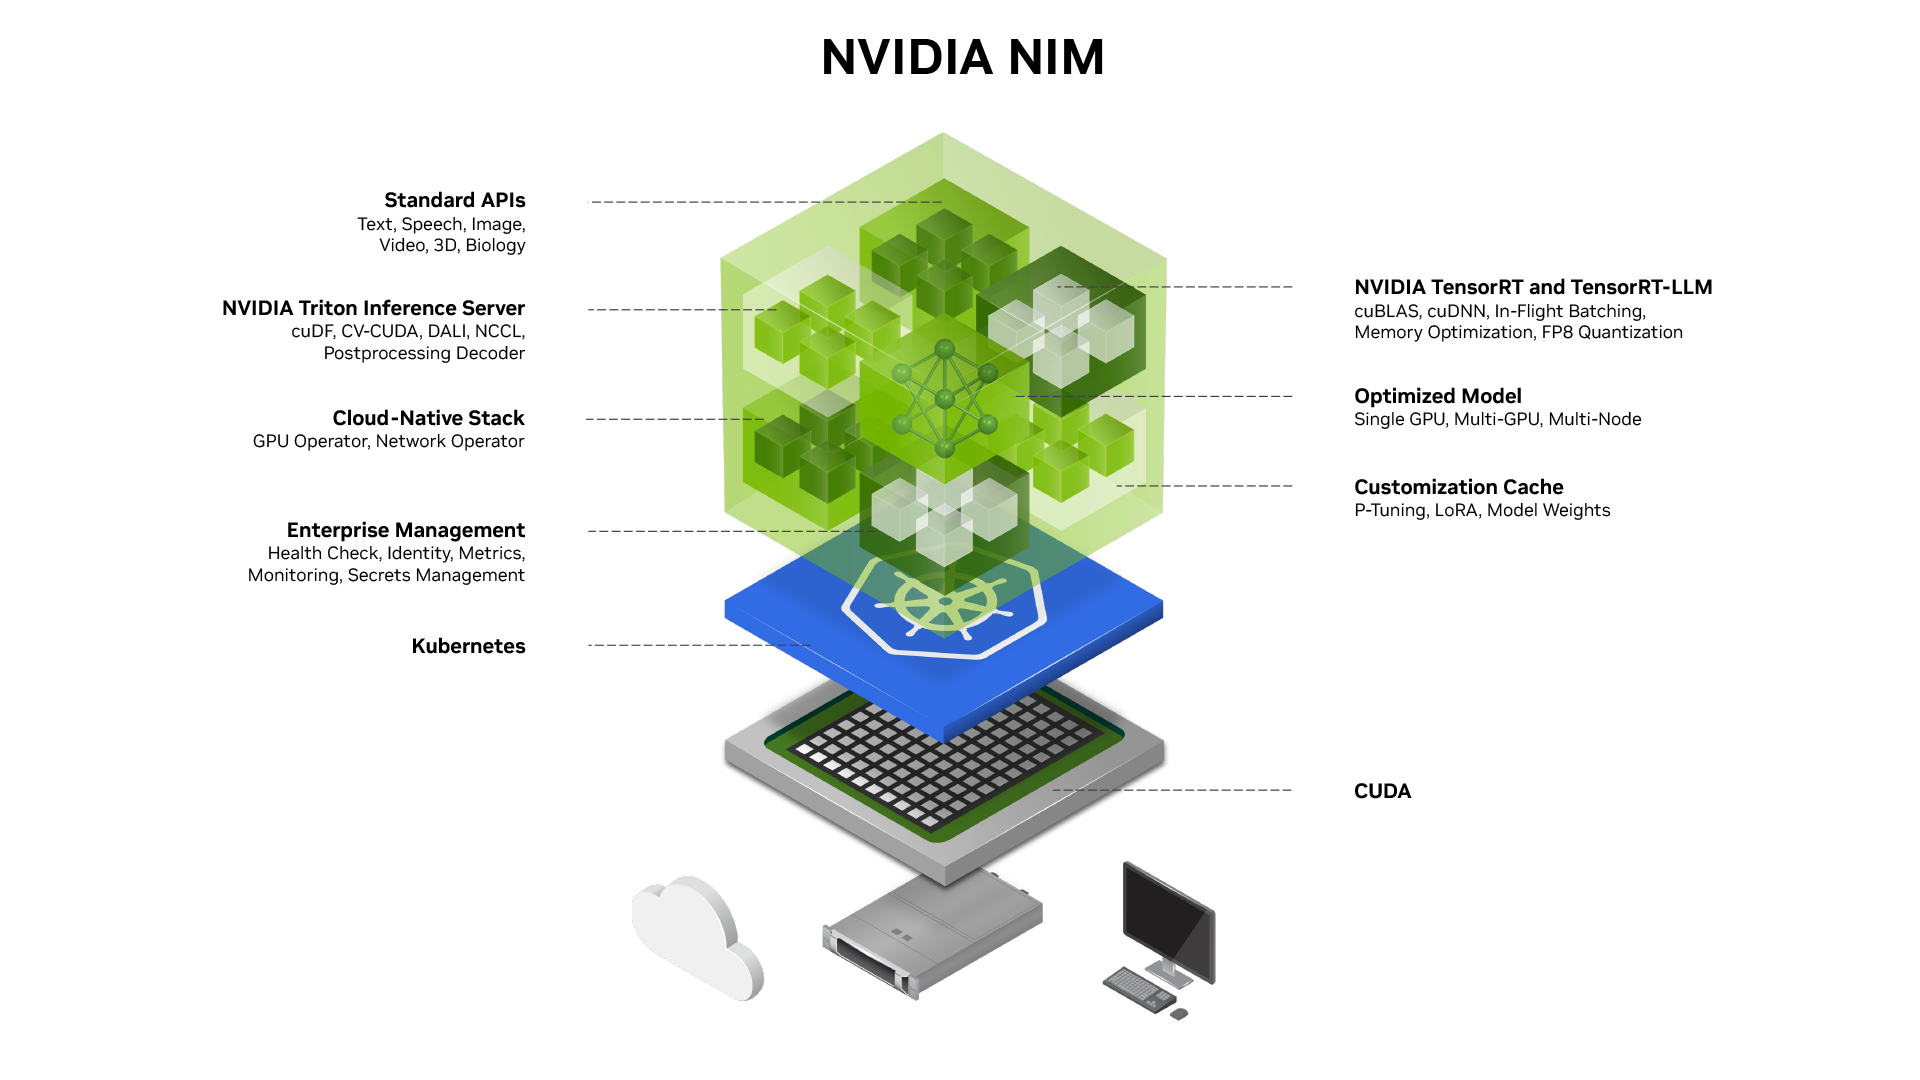
Figure: NVIDIA NIM Architecture
How does NVIDIA NIM manage running an LLM model?
First, the CUDA layer is optimized for high-performance GPU operations. This is necessary for the language model to run quickly and efficiently. After the optimization process, NIM starts the deployment of the model using Kubernetes. It runs the model inside a container and automatically determines and manages how its resources will be used.
Before the inference process, NIM activates the enterprise management layer. This layer performs health checks on the model and monitors resource usage. If any issues arise, it analyzes the situation and intervenes as needed.
Customization Cache stores model adaptations and weights made during or before inference for quick use. This makes model inference more dynamic and tailored to user requirements.
Subsequently, NIM establishes a cloud-based infrastructure where GPU operators and network connection management come into play. NIM ensures that these resources are used with the highest possible efficiency.
When your language model is ready to run, NIM loads this model onto the Triton Inference Server. Triton processes the data and optimizes the results to accelerate the model’s inference. During these operations, the following libraries are used:
cuDF: GPU-based data processing similar to the Pandas DataFrame structure.
CV-CUDA: Performs fast image transformation, scaling, and filtering on the GPU.
DALI: Handles GPU-based data loading, augmentation, and preprocessing.
NCCL: Synchronizes data transfer and coordinates parallel processing in multi-GPU environments.
Postprocessing Decoder: Converts raw data from model inference into a human-readable format.
NVIDIA NIM uses tools like TensorRT and TensorRT-LLM to further optimize the model. These tools optimize mathematical operations at the hardware level to make the model run faster. For GPU acceleration, the cuBLAS and cuDNN libraries are used. Finally, NIM provides standard APIs to facilitate user interaction. Through these APIs, models can be called in OpenAI format or used via Docker containers.
To run NVIDIA NIM models locally, you can review the NVIDIA documentation and visit the website.
Conclusion
Running NIM in Cordatus
When it comes to running Large Language Models (LLMs) quickly and efficiently on a PC, NVIDIA’s NIM technology stands out. NIM provides an incredibly fast runtime optimized for LLM execution, making it ideal for high-performance AI applications. Cordatus simplifies the process of running NIM, enabling users to deploy and run LLMs with ease.
In this guide, we will walk you through the steps to run an LLM using NIM on Cordatus.
Why Use NIM in Cordatus?
Unmatched Speed : NIM is engineered to deliver blazing-fast inference on supported PC hardware, making it the fastest way to run LLMs on desktop systems.
Optimized for PC : NIM is optimized for PC-based GPUs, making it an ideal solution for researchers and developers working with high-performance computers.
No Setup Hassles : With Cordatus, you can deploy and run your LLMs using NIM without needing to handle the underlying setup and configuration.
Low Latency : Enjoy low-latency responses and fast execution, even for large models, thanks to NIM’s efficient design.
Serve LLaMA 4, QwQ & More via NVIDIA NIM in Cordatus
Method 1: Model Selection Menu
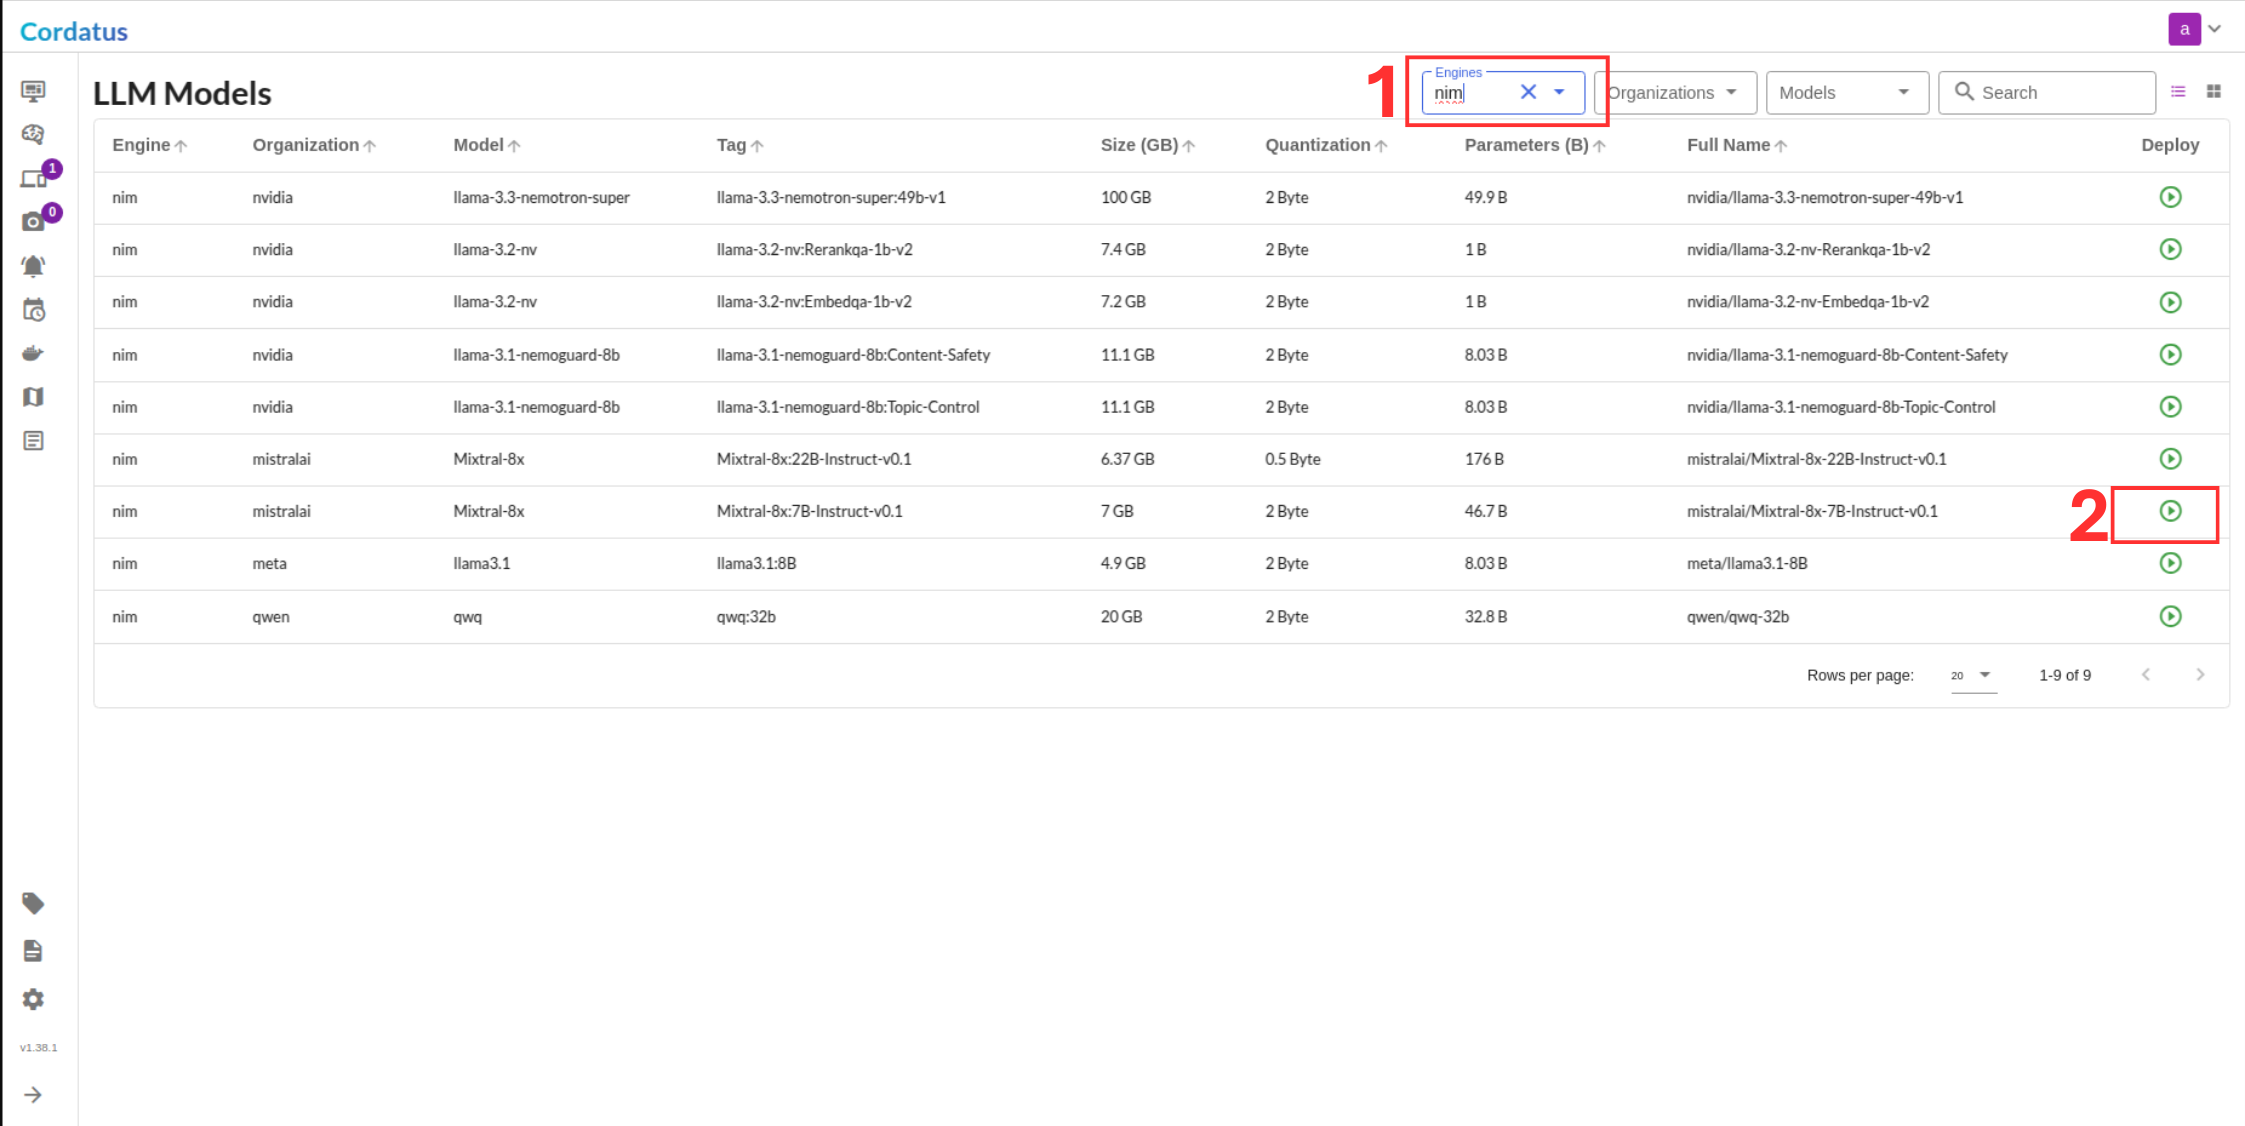
1. Connect to your device and select LLM Models from the menu.
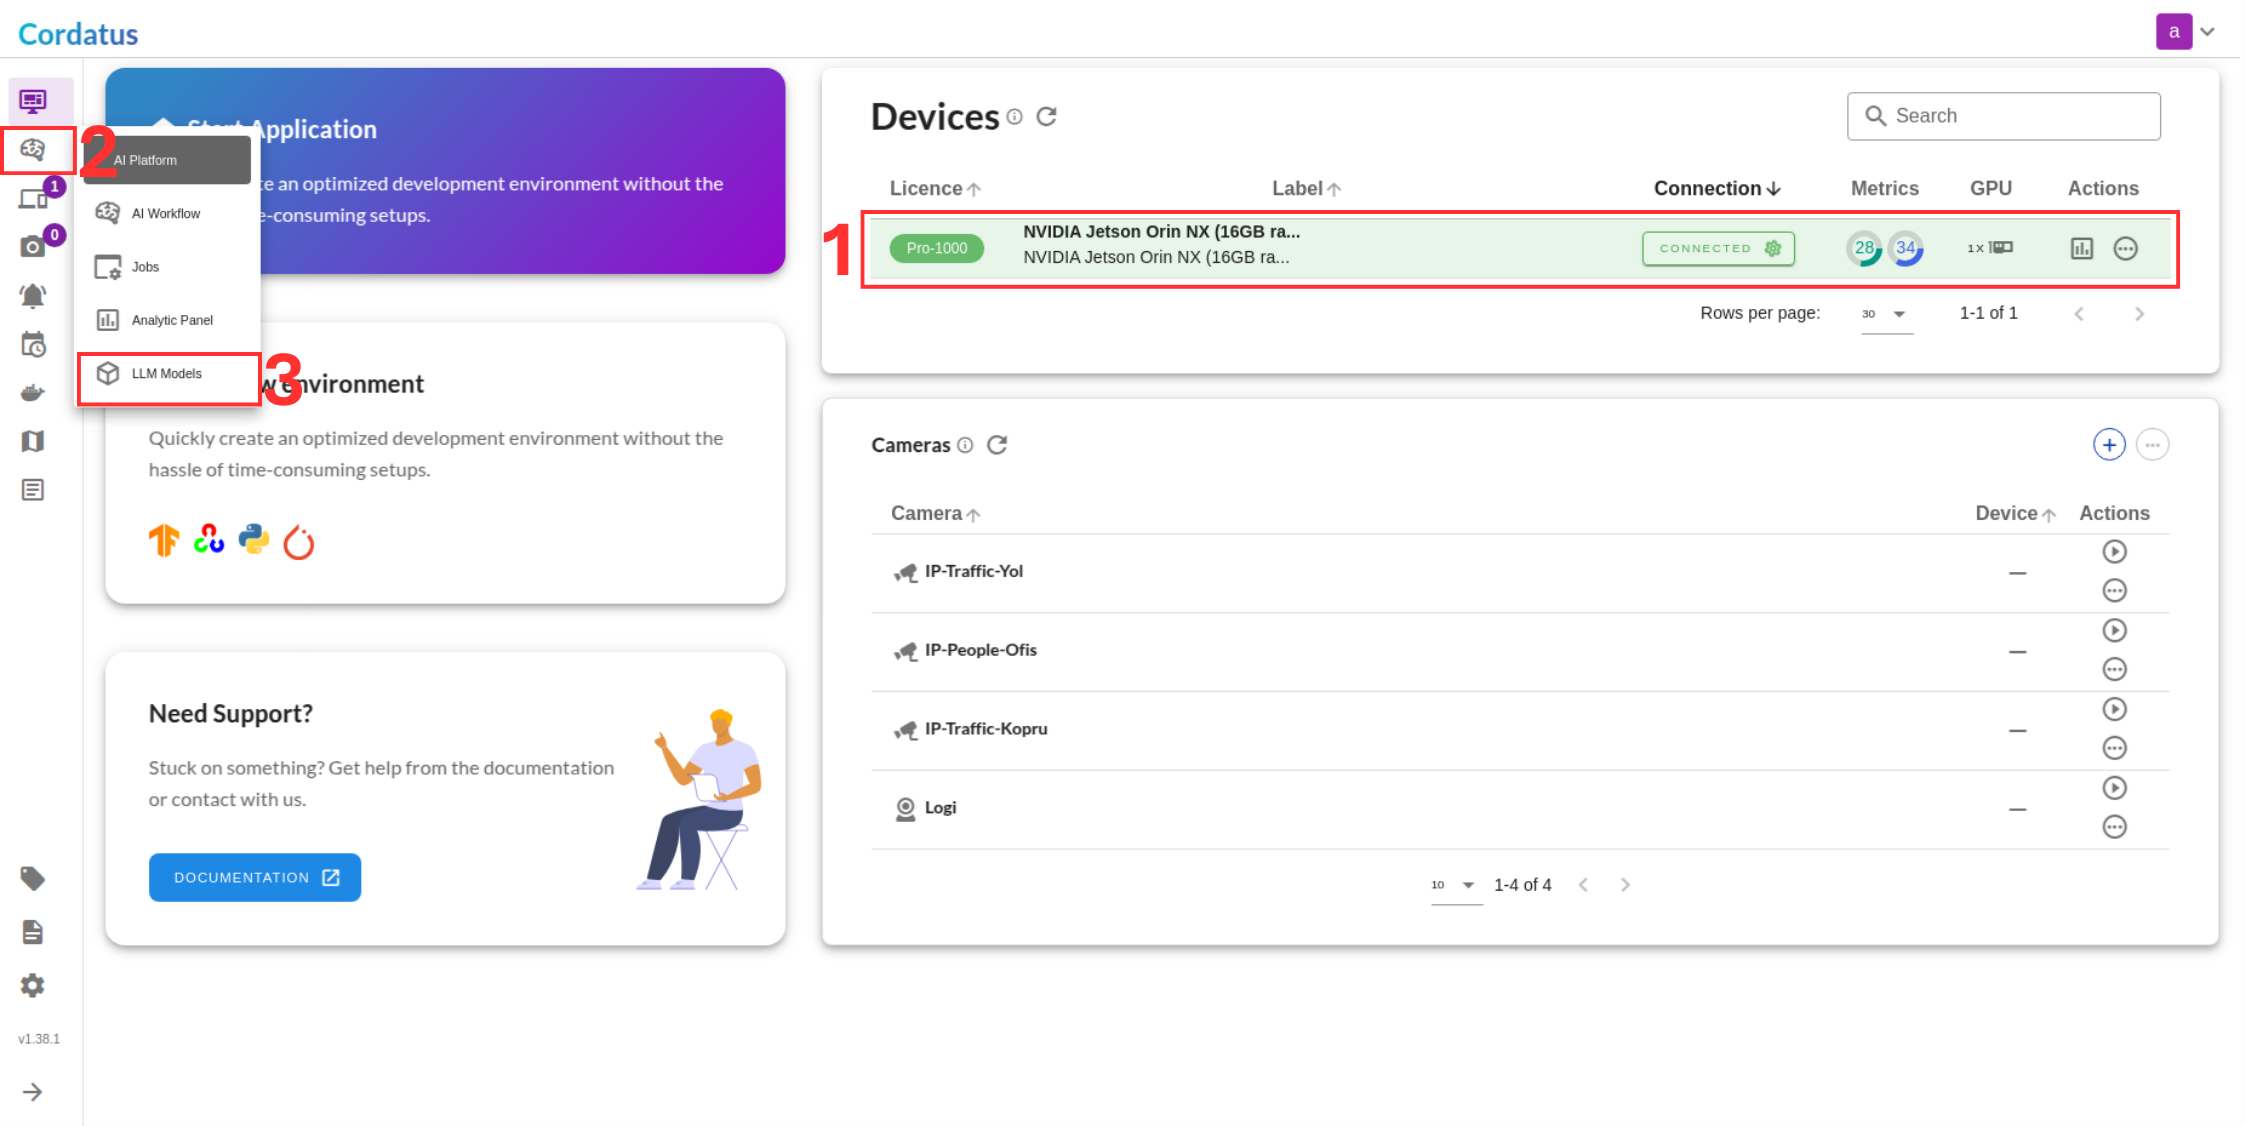
2. Select NIM from the model selector menu, choose your desired model, and click the Run symbol.
Method 2: Containers-Applications Menu
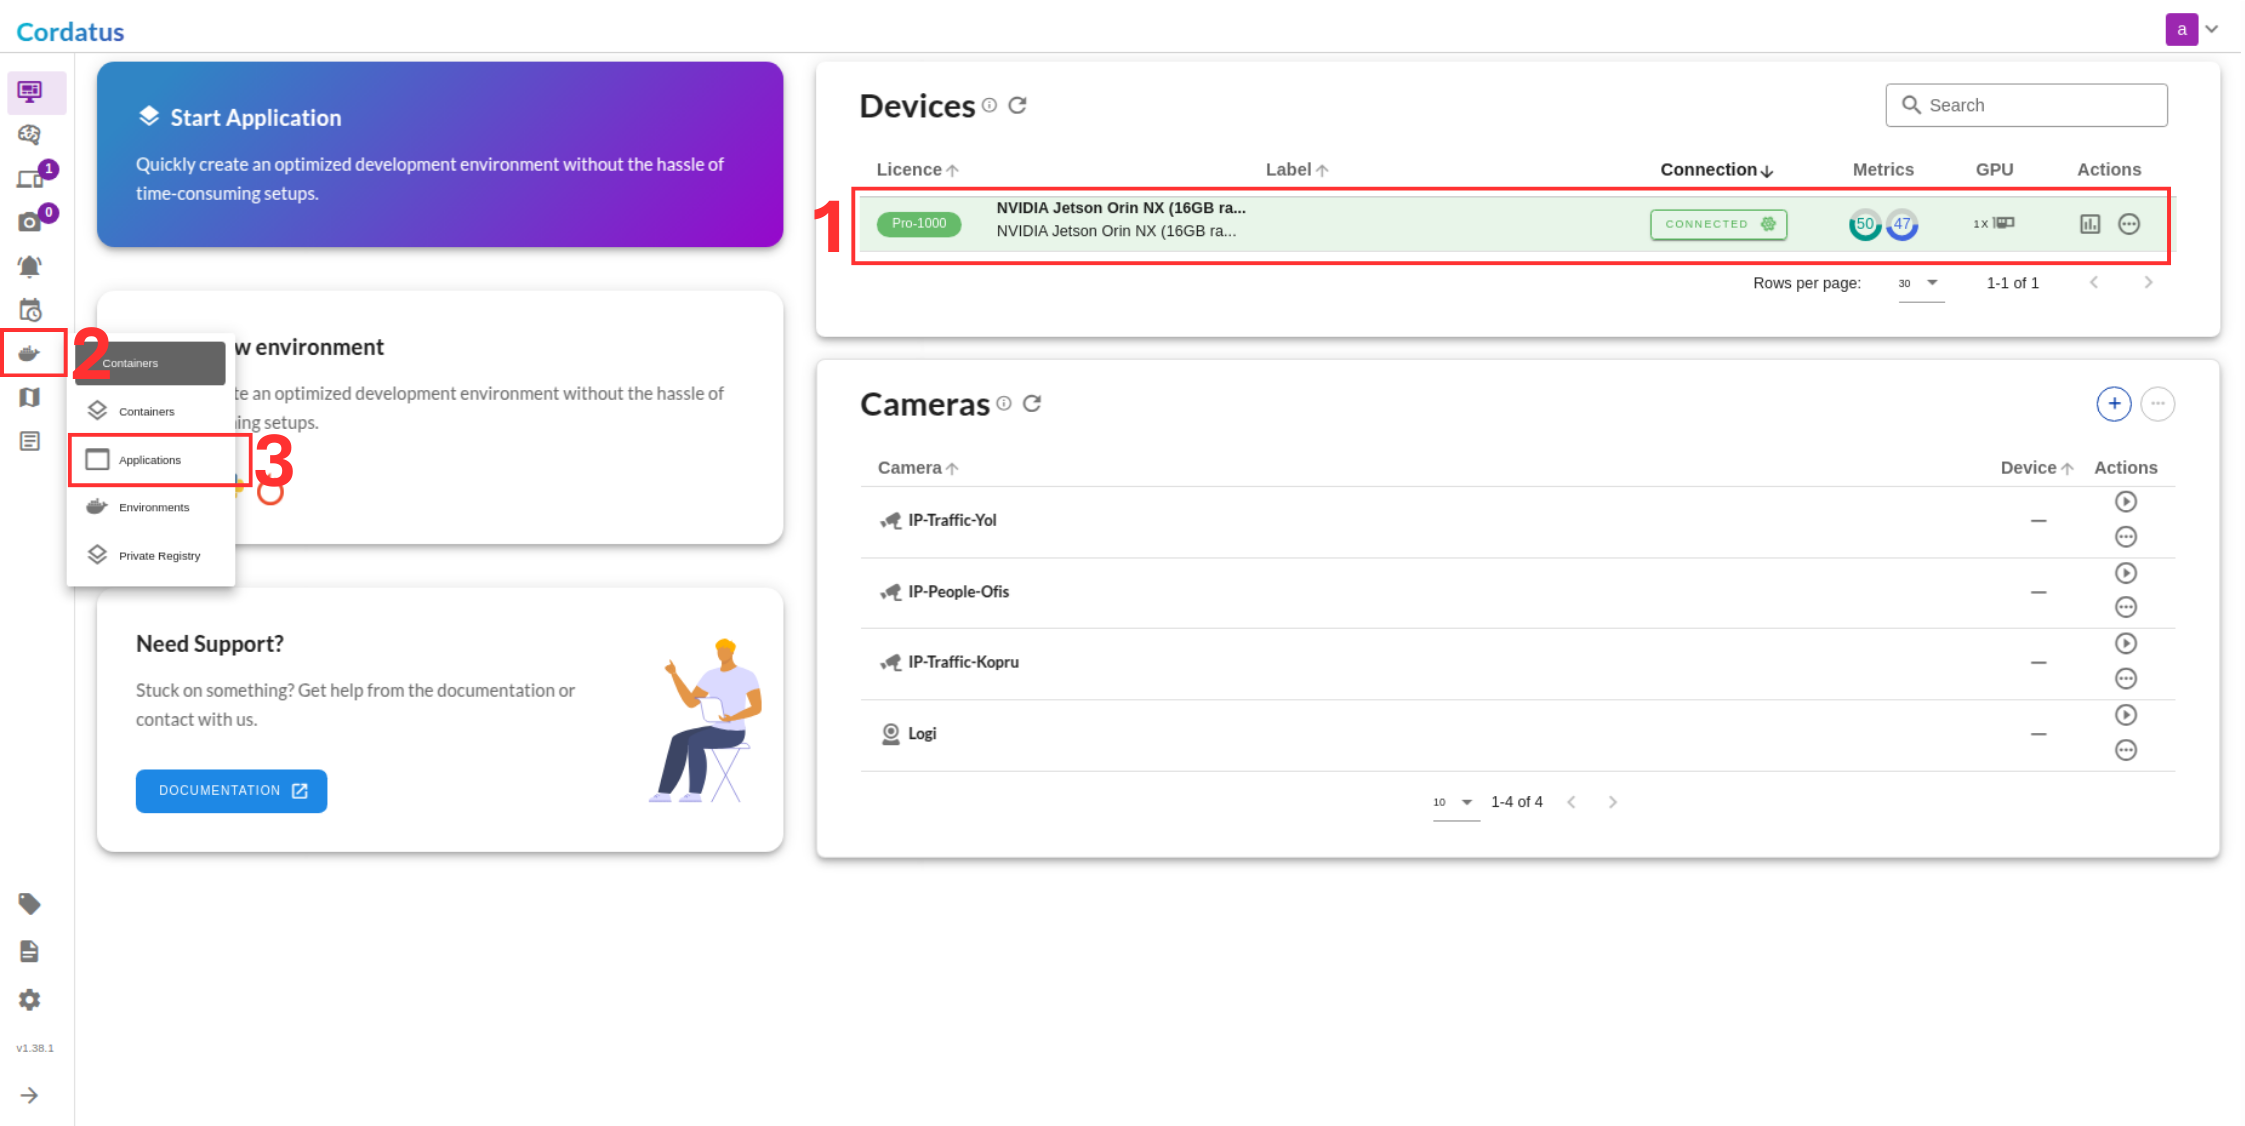
1. Connect to your device and navigate to Containers-Applications.
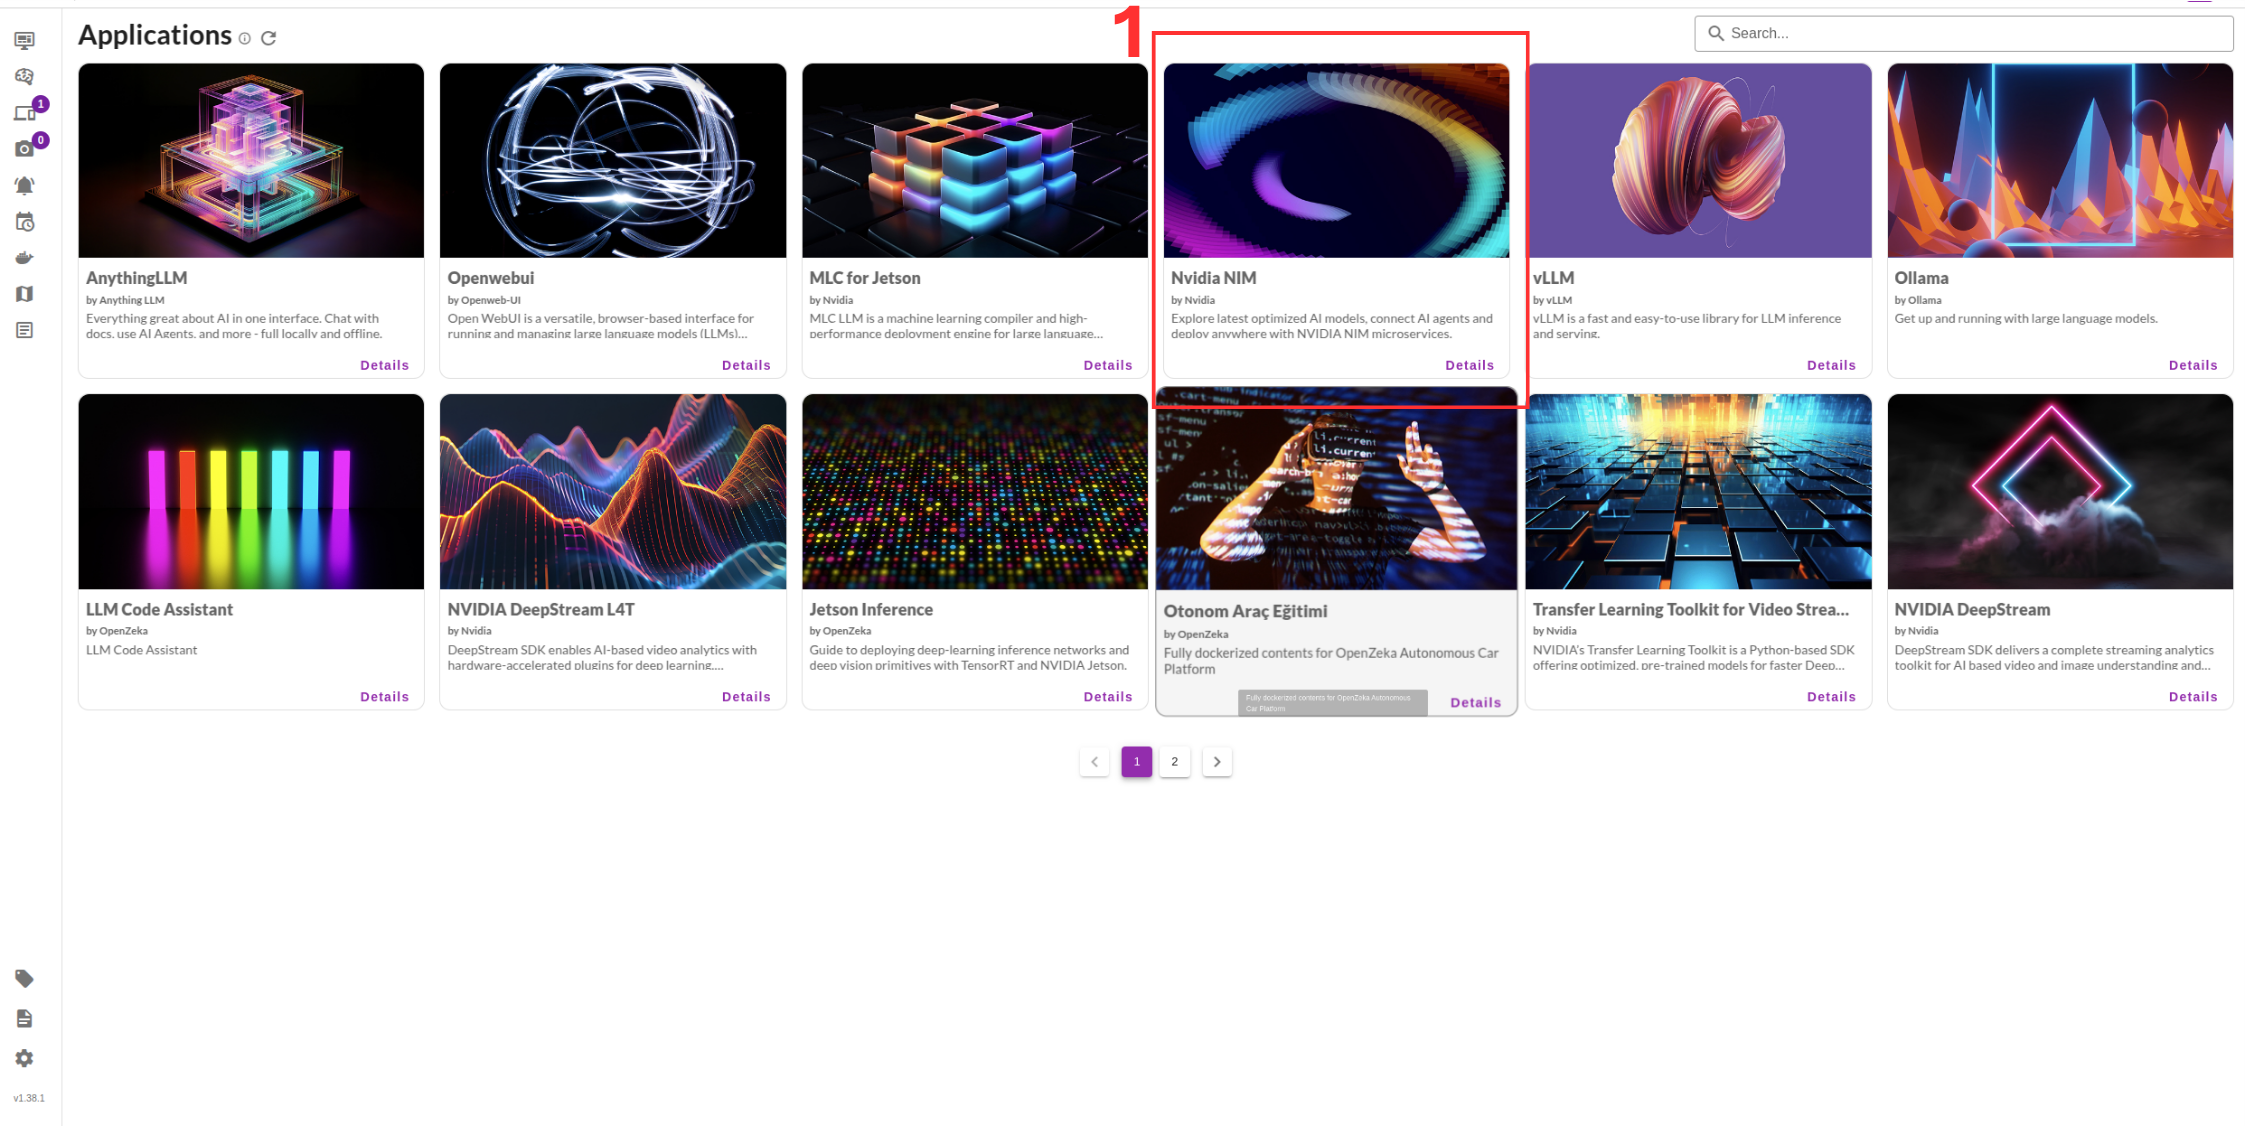
2. Select NVIDIA NIM from the list.
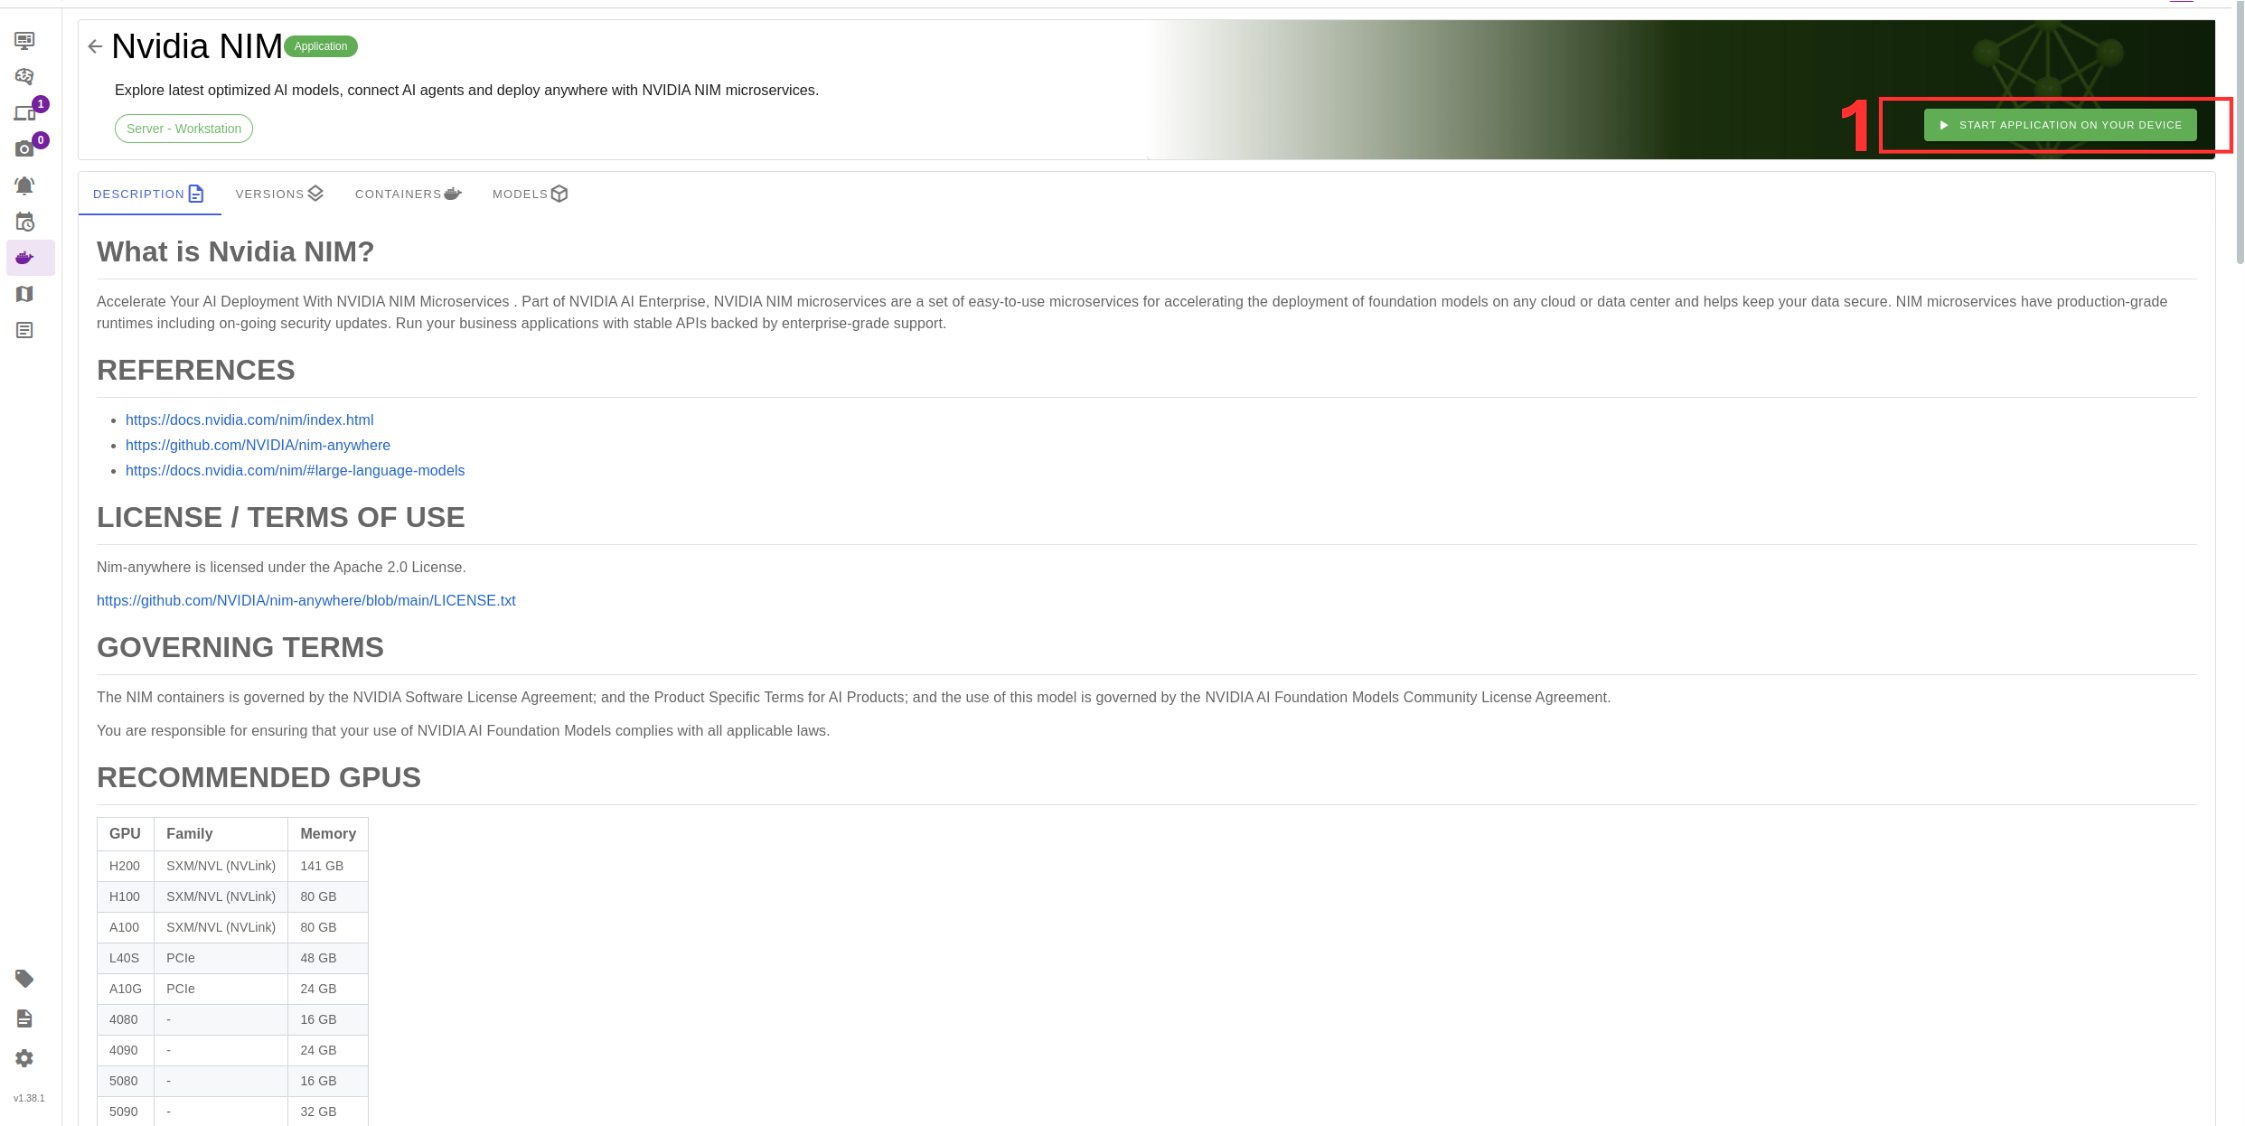
3. Click Run to start the deployment.
Configuring and Running the Model
After selecting the model, follow these steps to complete the setup:
4. Select the target device where the LLM will run.
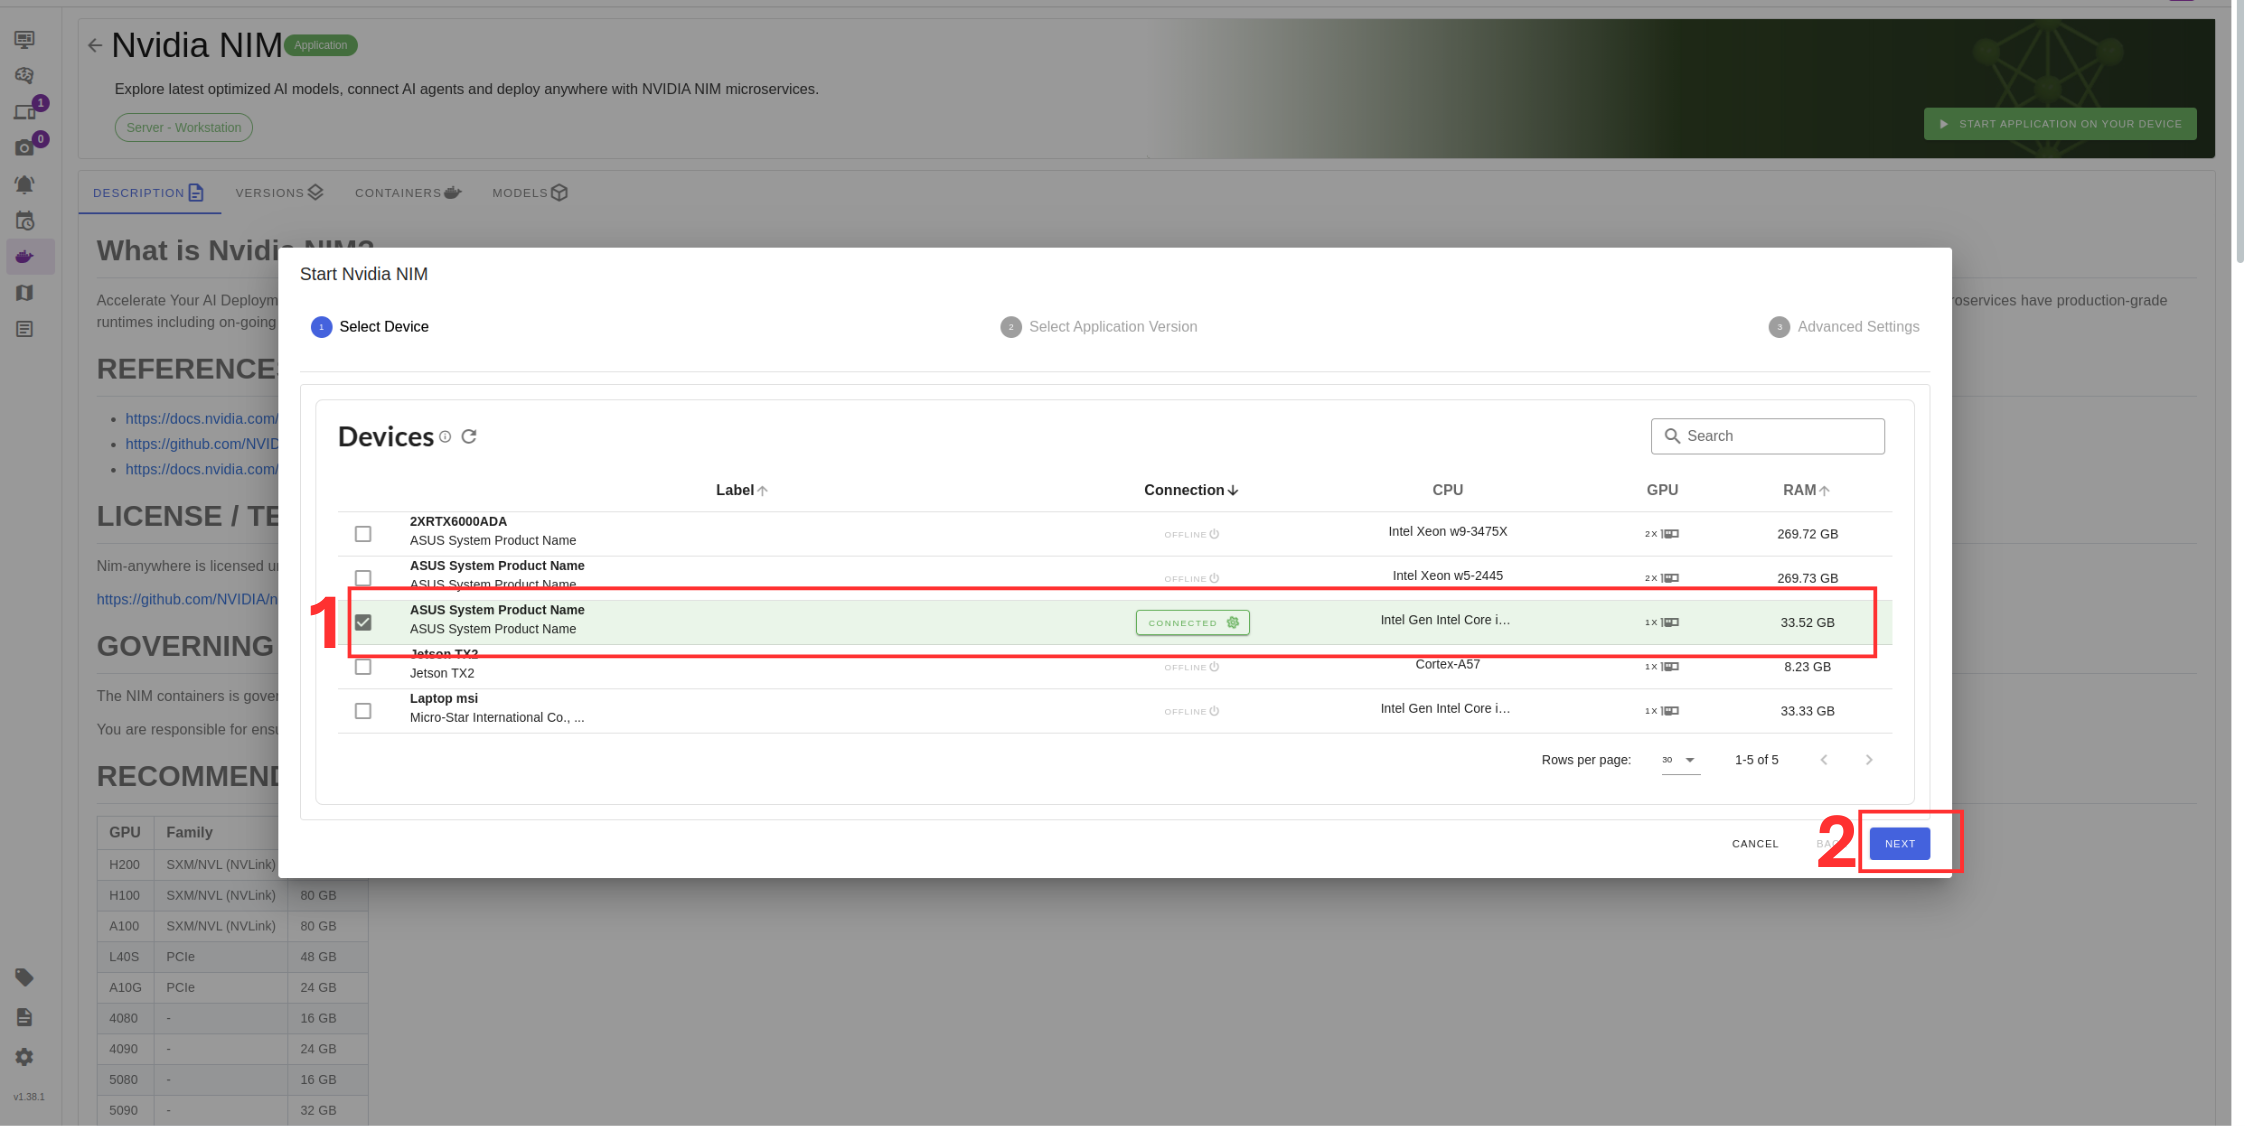
5. Choose the container version (if you have no idea select the latest).
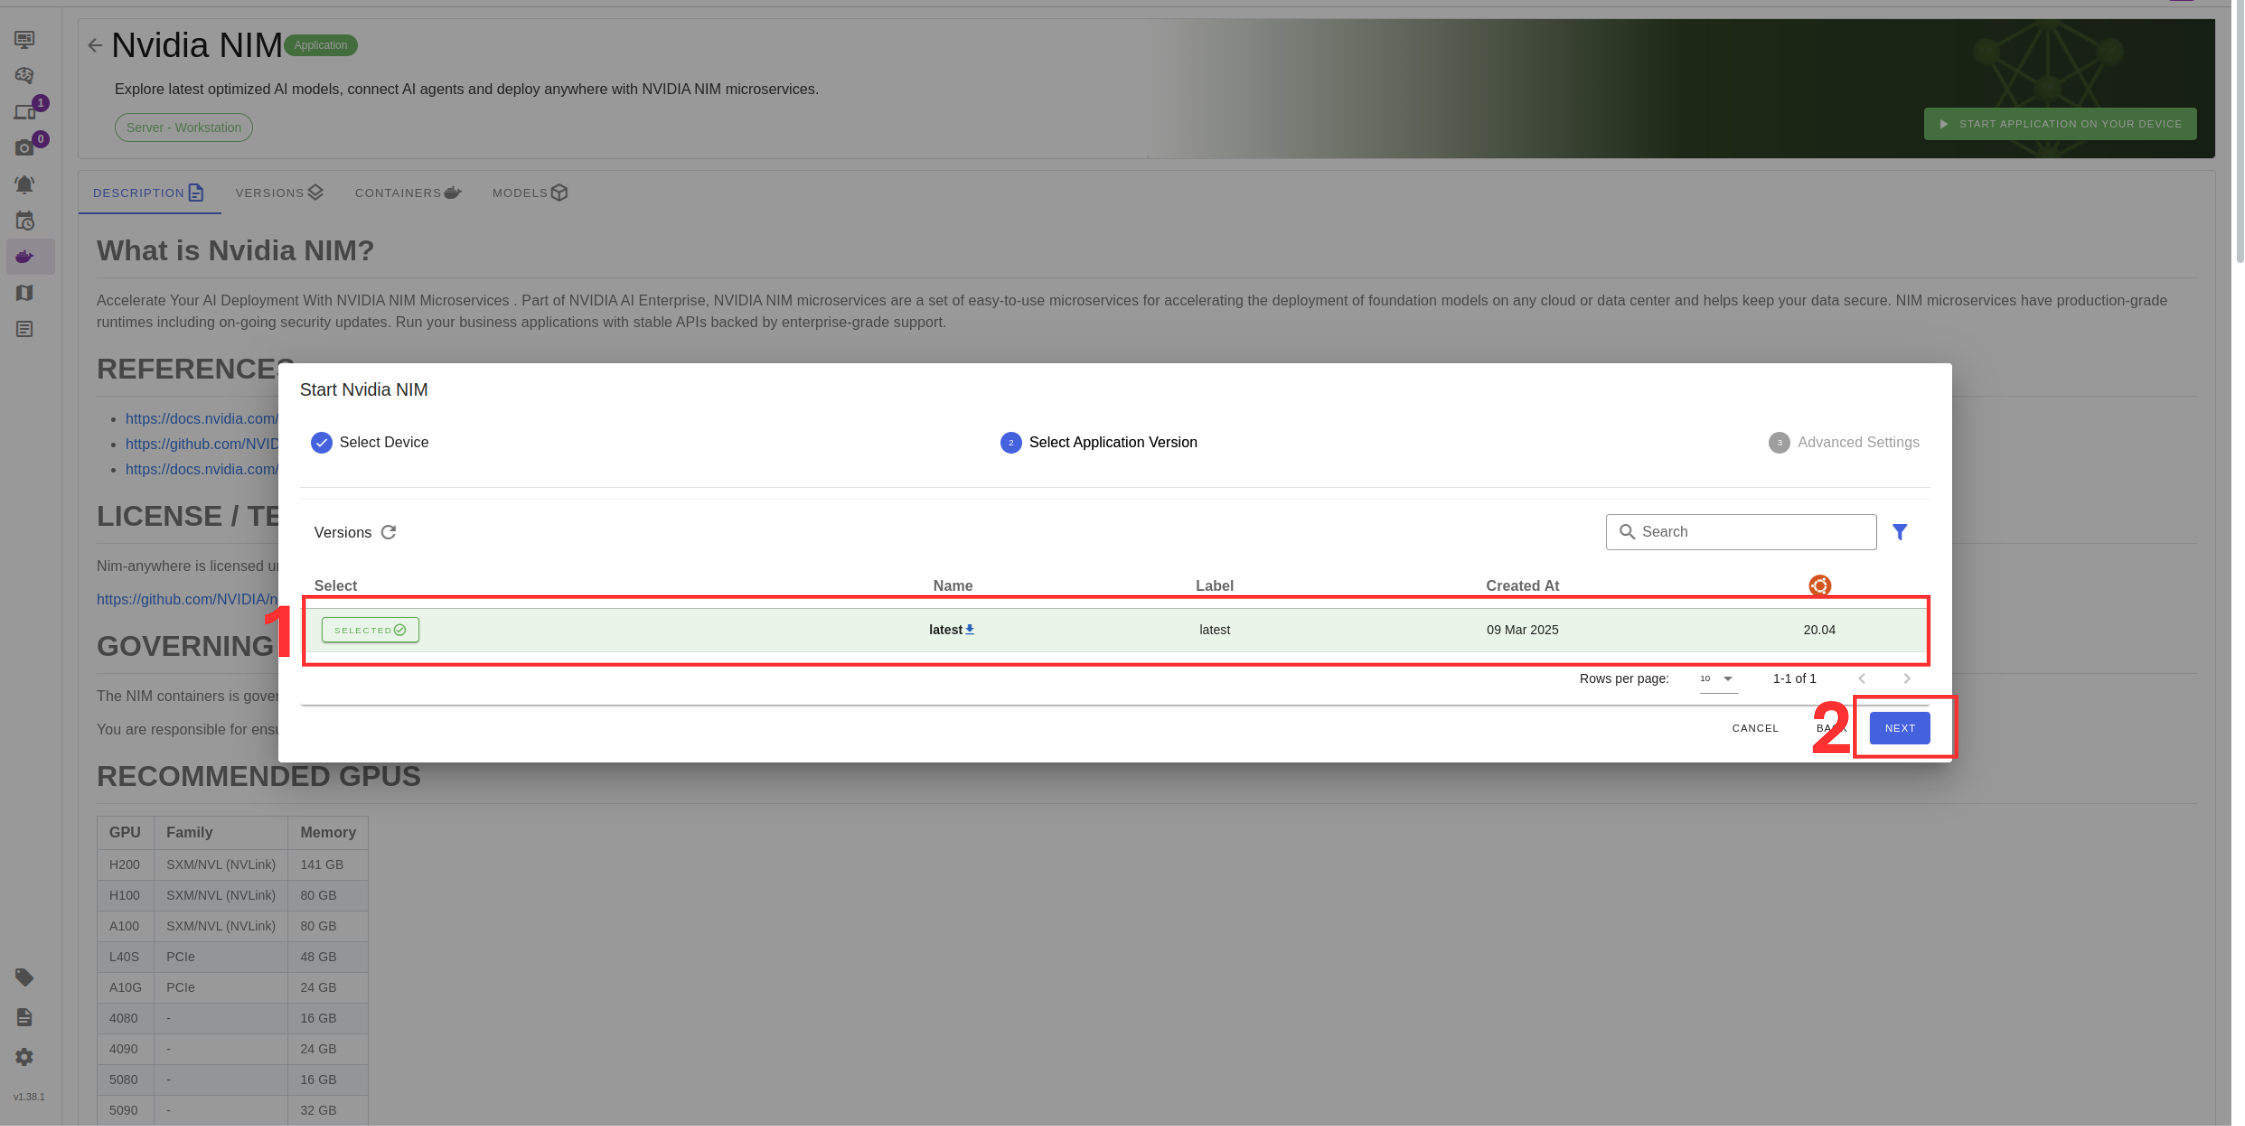
6. Verify the correct model is selected in Box 1.
7. If you have multiple GPUs you can select which ones you want to run LLM or you can select all GPUs option from Box 2.
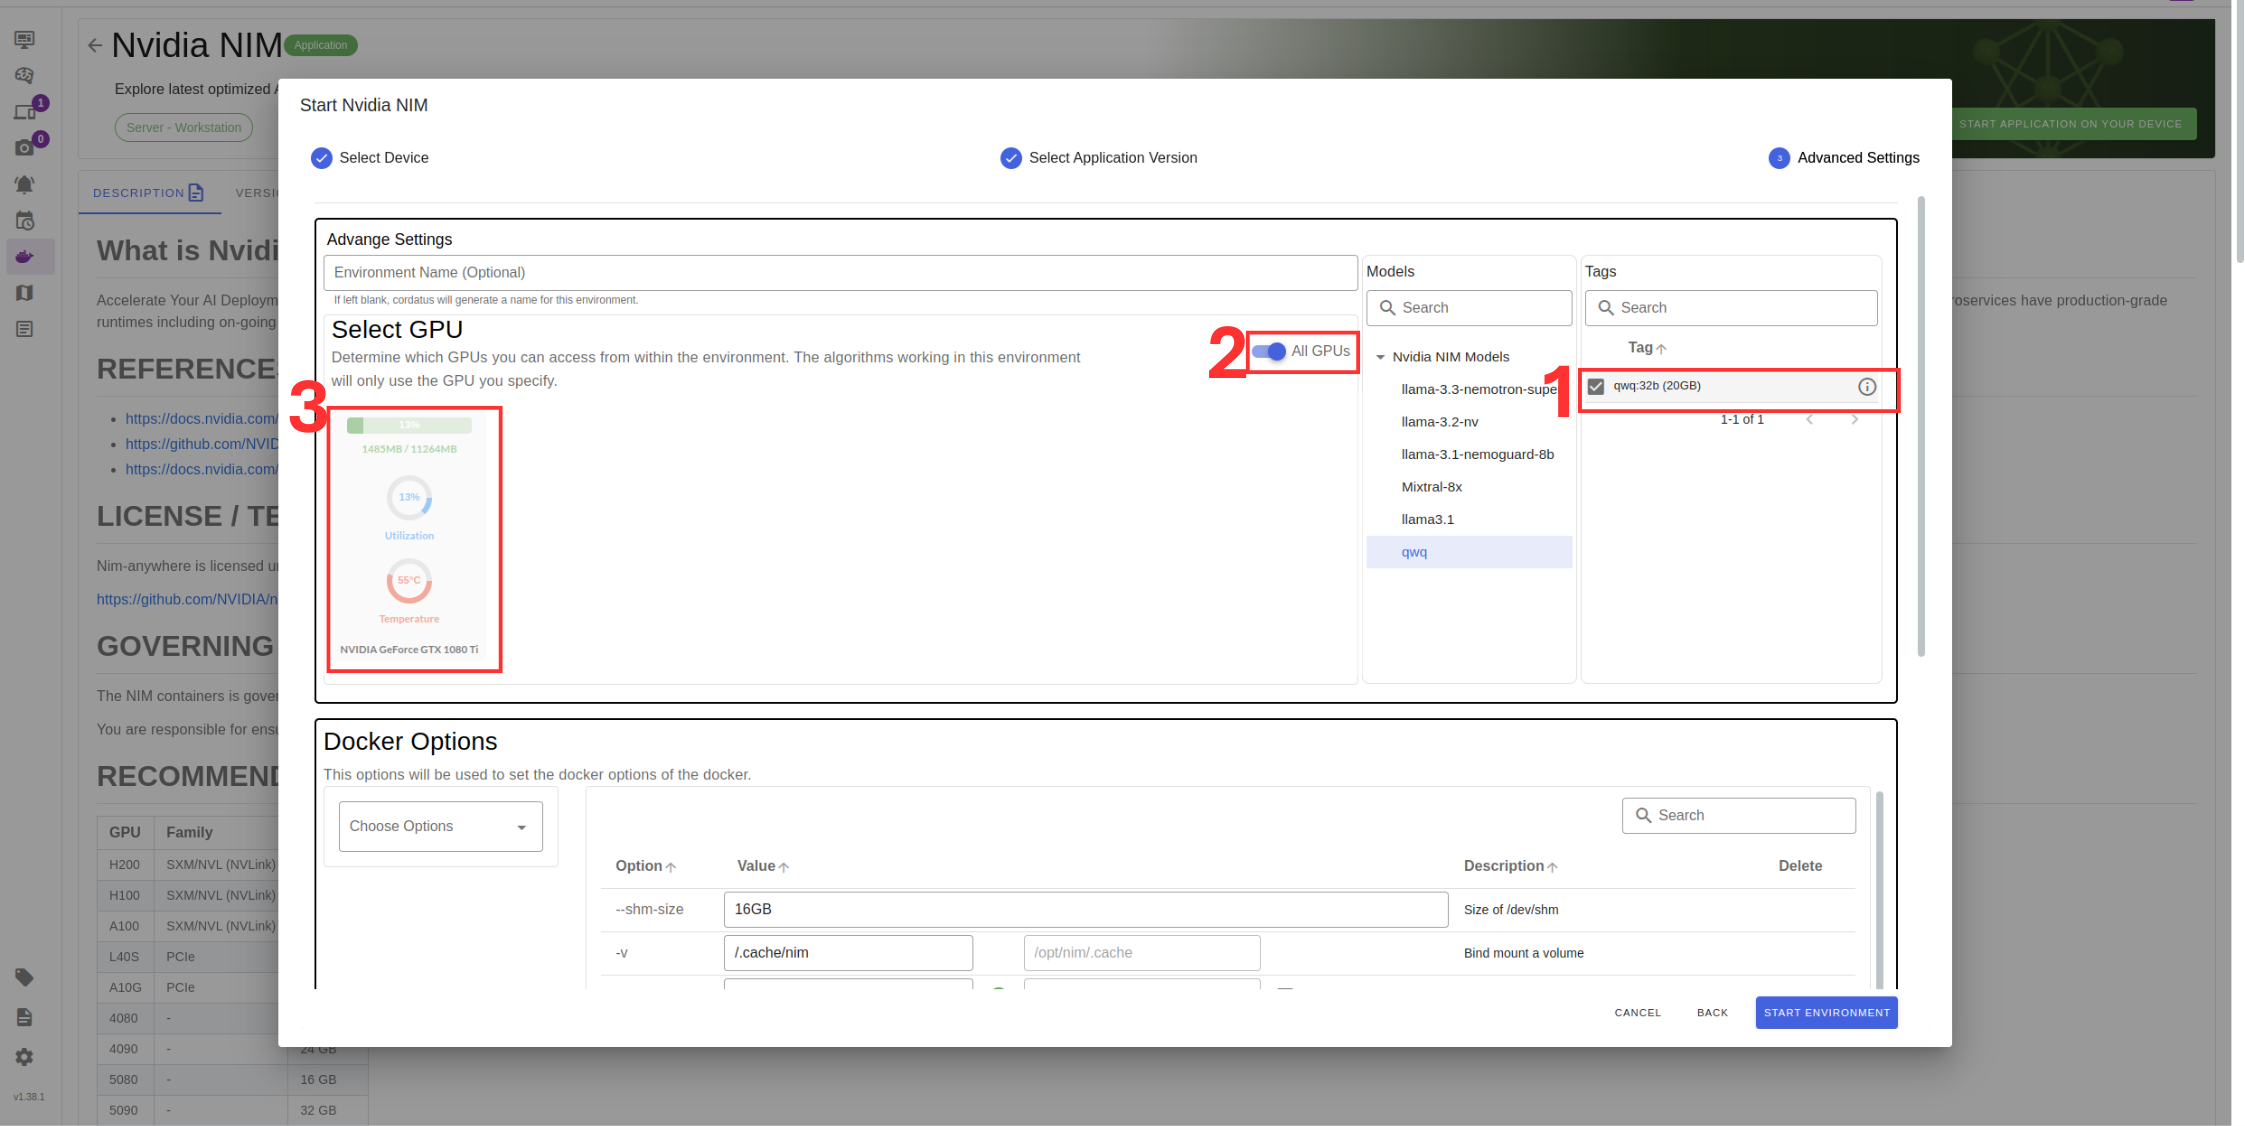
8. Check port availability in Box 3 .
9. Set NVIDIA token .You can obtain from build.nvidia.com.
10. You can setup Jupyter notebook if you desire.
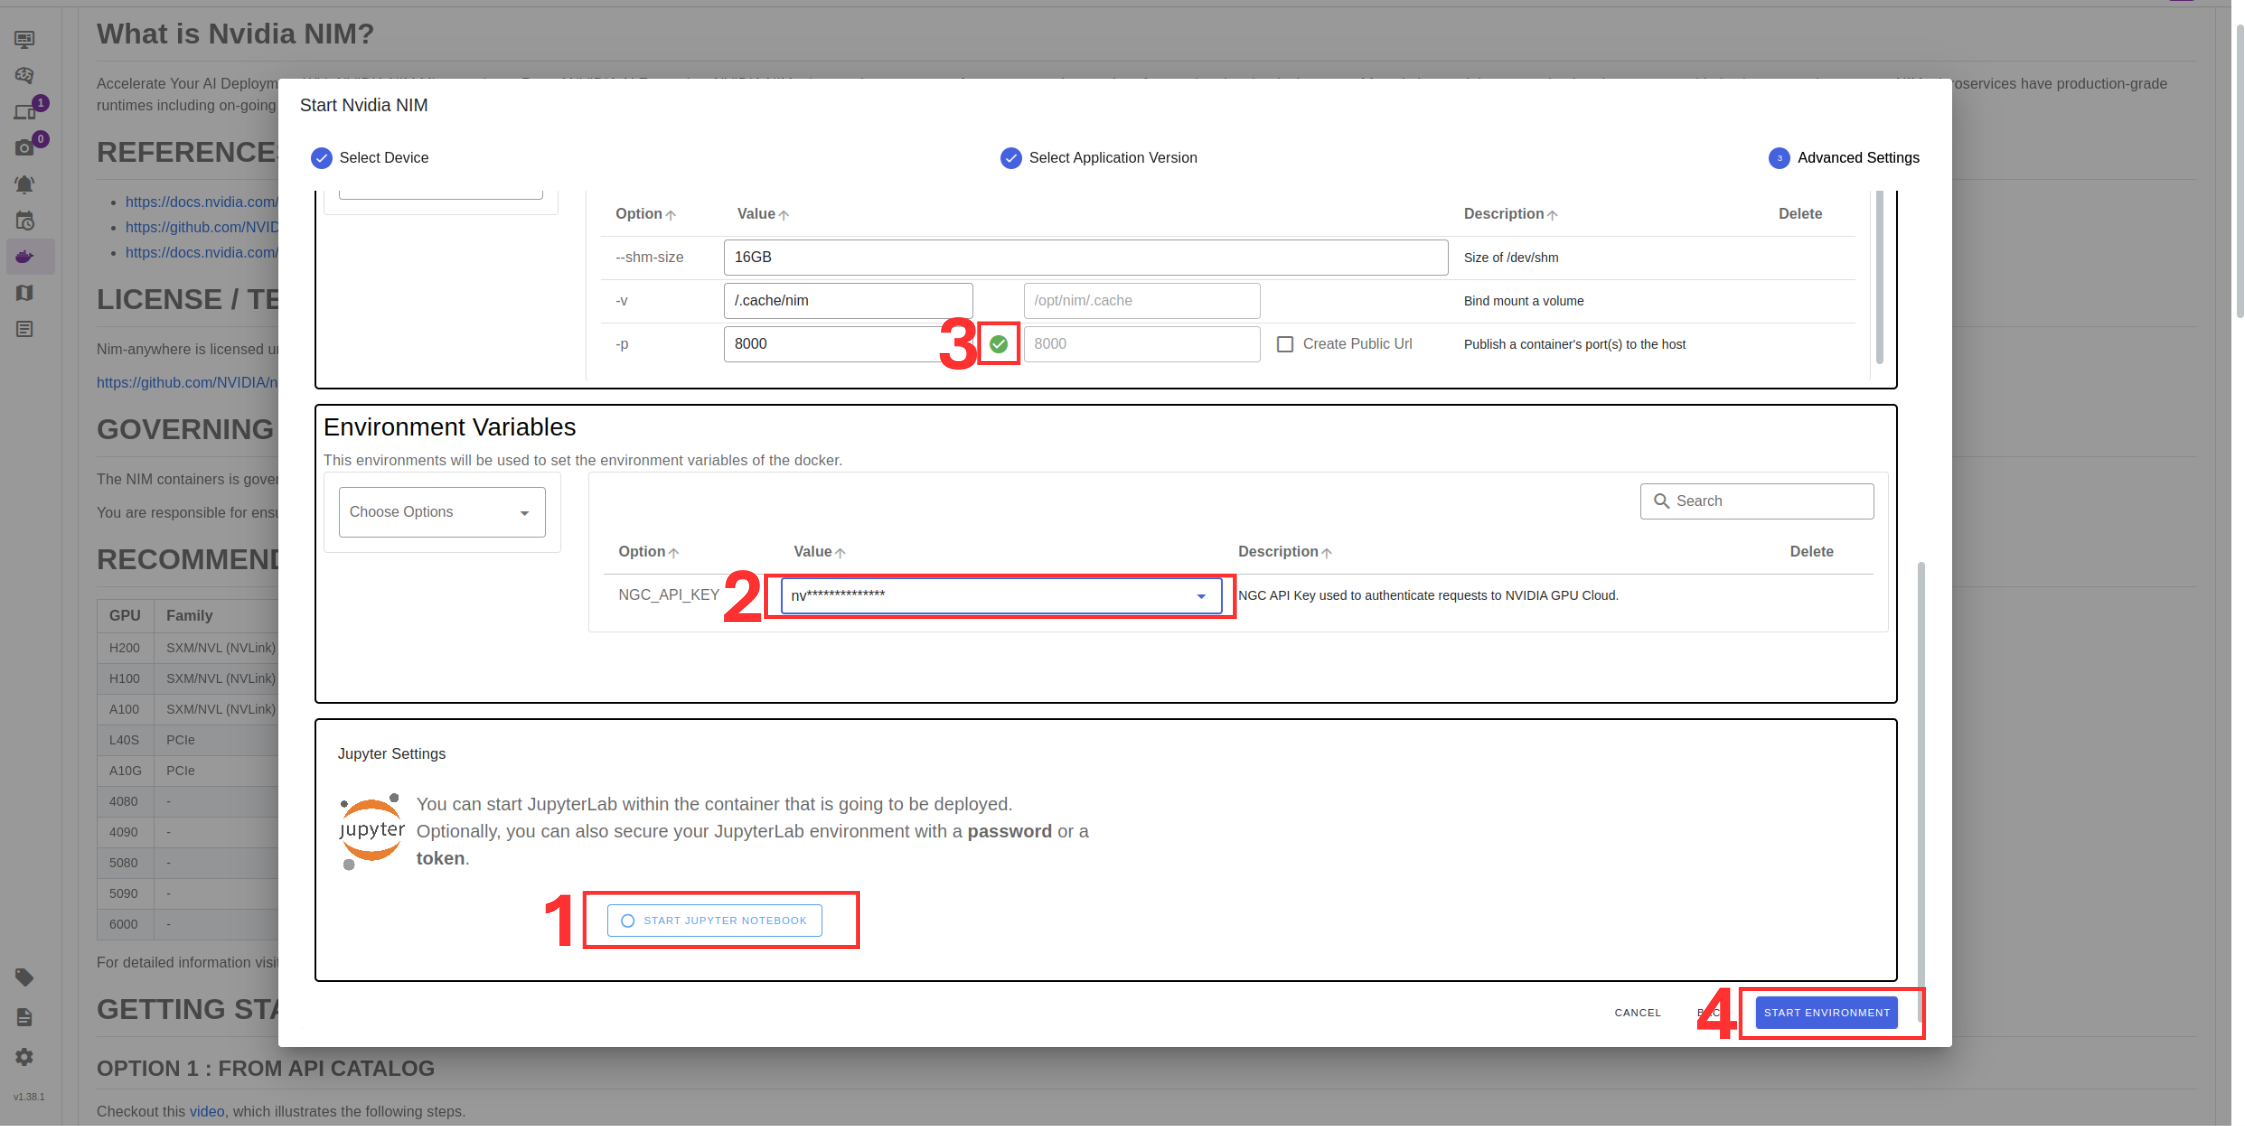
11. Click Save Environment to apply the settings.
Once these steps are completed, your model will start running automatically, and you can access it through the assigned port.


